![]()
Badges are comprised of courses and represent skill mastery of some kind. When earned by a learner they will earn a certificate that can be shared to prove their mastery of the skill.
When deciding whether to create a badge or a learning path, ask yourself if you want the entity to include a small amount of courses representing the mastery of a skill or micro-skill (Badges) or if you want the entity to include a larger amount of courses representing the mastery of a broader topic, app or theme (Learning Paths).
When creating badges you will have a number of fields that will need to be added. You will not be able to Publish a badge until each field is added (you will be able to Save a Draft if need be.)
Please note this is also a course in the HQ Learning Path. If you would like to view the video instead of going through these step by step directions, please click HERE.
- Create- Choose Create Badge from the HQ Dashboard or choose Badges from the Create tab.

- Create Badge- Click Create Badge in the top right corner

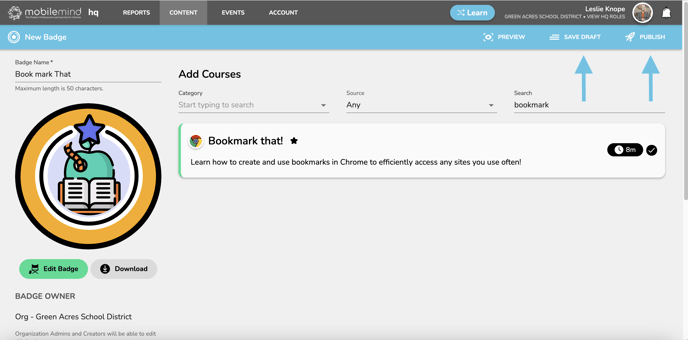
- Badge Name (Required)- Add a Name for your badge

- Badge Studio- Click the Badge Studio button

- Find an image by using the filtering options or you can choose to upload your own image.


- If you click on the outer ring or the star and you can choose a different color. Once you have the colors the way you would like, click Save and Use under the badge.
- You can then choose to download your badge if you want your learners to be able to hang it up or turn it in as an incentive they you have created. You can also click on Edit Badge if you would like to make any changes.

- Courses (required)- The most important part of creating a badge is deciding which courses need to be completed to earn it!
- You will be able to choose from the full library of global MobileMind courses along with courses created by your district.
- We include several filters along with course descriptions to help choose what's right for your badge.
- You can search for courses using the filtering options at the top. If you would like to search for courses created by your district, use the source filtering option and choose your district.
- Click on the courses you would like to include in this badge. You will see a green line appear on the left side. The courses you have chosen will appear in the bottom left of your screen. You can drag and drop them to put them in a specific order if needed.

- Choose Visibility- If you only want to allow specific groups or job titles to see this badge, you can select those on your left sidebar. If you are a group admin or creator, you will only see the groups for which you are assigned.

- Save Badge- Click Save Draft or Publish if you are ready for this badge to go live. Reminder...All required fields must be completed in order to be able to publish. The status of the badge will be indicated on the right side of your list of badges.
- Once you click Publish, a dialog box will come up and let you know that anyone that has completed any of these courses will automatically be awarded these badges.

- If you no longer wish for learners to be able to see this badge, click on the badge, check the box in the left sidebar under the badge image titled Archive. The Publish button will become Archive. Click that and you will see that indicated in the status column.

Video Directions