
If you are having a multi session PD day or a conference that will last more than one day, you can use the conference feature in MobileMind Events to organize everything!
Please note:
- This is also a course in the Events Learning Path. If you would like some tips to browse through before you start creating, please click HERE.
- If participants want this to show up on their Google Calendar, they must link it from their MobileMind Events page first. Only events that they RSVP to will show up on their Google Calendar.
From your HQ Dashboard, click on the Events tab in your top banner. You also have the option to add this to your Quick Actions on your left sidebar.

Click the New Conference from your left sidebar.


Just as when you are creating a single event, the creation page is set up by required sections and optional sections.
If you roll your mouse over the Publish button, you will see which fields you are missing that are required. The first three sections are required.
*This can be a handy feature when you are creating a past event that you need to get put in MobileMind for attendance tracking purposes.

Required Fields for the Details Section: Event title, start date and time, end date and time, description, and category.
*We suggest trying to keep the description short since this is what will show up on the conference card on the calendar. If you want to put more detailed information, use the Additional Notes section. This is a great place to list the tag words you used or how you color coded your sessions.

Optional Fields for the Details Section: Choose if you want this session to be In Person, Virtual, or Blended (Type). Choose difficulty level for this session, add any tag words (makes searching easier for users), a banner, and any additional notes.
*Here is a link to my banner template I use in Google Drawings (force copy). Once I finish it, I either take a screenshot or download it as a JPG or PNG file.


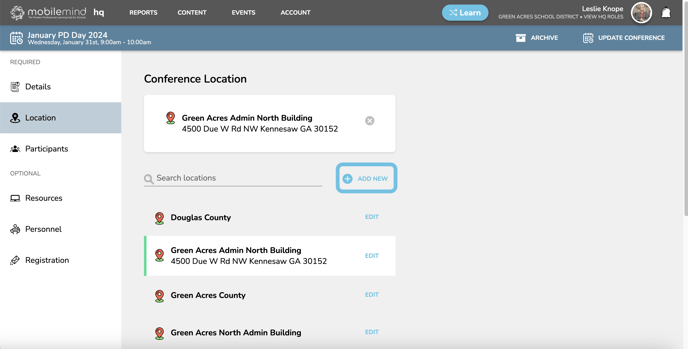
Required Fields for the Location Section:
- For this section, the only requirement is to choose or add a location. You can enter the location into the the first field and it will search Google Maps for that location.
- When you use this feature, the Google Map will be displayed on the left sidebar of the conference for your attendees.
- You can also choose just to give the location a name instead of searching Google Maps.
- Once you enter the location, click Save in the bottom right. This location will now show up for you when you create future events.
- You do not need to enter a room number for the main conference setup.
Optional Fields for the Location Section:
- If you chose Virtual or Blended for the Event Type, you will see the space for the Meeting Link.


Required Fields for the Participants Section:
You can choose to invite all participants to the event or you can create a custom list. You can filter your list by Group, Job Title (not recommended), or Individuals.


Optional Fields for the Participants Section:
The optional sections are a little different for a conference than the single event. You can choose to award PD credit for the entire conference or for each session. If you choose to award credit for the entire conference, you will not see this option when creating the individual sessions. If you choose to award credit to each session, then you can't change this back.


You do not need to complete the bottom three sections in order to publish or save your conference as a draft, but they are very helpful for managing your conference.

Optional Fields for the Resources Section:
Conference feedback form, related courses and learning paths (prerequisite and replacement), and helpful links and attachments.
- Conference Feedback- Keep in mind that this would be for the conference as a whole. You have the option to use a session feedback form when creating your sessions.

- Related Courses/Learning Paths- This is great to use when you want teachers to complete introductory courses prior to attending a live training, but probably isn't necessary for the main part of the conference.

- Support Contact- You can list email addresses in the event that teachers have any questions about the conference.

- Helpful Links & Attachments- This would be a great place to attach a map of the building where the conference is taking place or any district links that may be helpful.


Click the Add Personnel button and search for the people you would like to give permission to help with this event.


You can choose between Conference Manager and Conference Secretary. For more detailed information on Events Personnel, please click HERE. If you are going to have a keynote speaker or an opening session where there will be a presenter, you could simply add that as a session and indicate that in the additional notes in the Details section.


On the left side of the Registration Page:
You will have the option to allow invitees to register until the event starts or until a specific date. If you choose to enter a specific date then you will enter the dates they can start registering and when registration will end. Keep in mind, if you want people to be able to register and check in as they are entering the event, you will need to leave the registration window open past the start time.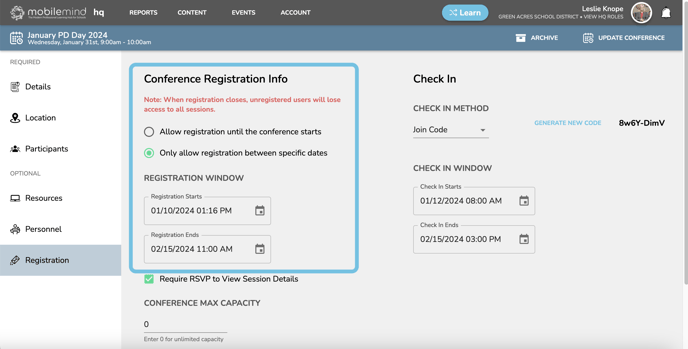
You can choose if you would like to require participants to RSVP to the conference before being able to view the session information. This will help give you an accurate head count of who will be attending.

You can set a max number of registrants. If you leave the number at 0 then everyone invited will be able to register.

You have the option to send reminders to those that have not yet registered for the conference. You can select multiple reminders id you would like.

On the right side of the Registration Page:
- You can select how you would like to take attendance. You can choose to generate a join code or you can take attendance manually on the day of the conference. The only way your attendees will receive a certificate for the conference is if they are checked in to it by the using the join code or checking them in manually.
- If you choose to use a join code, you may want to consider opening it up 15 minutes prior to the start time so participants can check in as they enter the room. You can also generate a new code if you want to change it after everyone in the room has been marked present to avoid the sharing of the code with those that are not there.
- You may not have a need to check people in for the conference as a whole if you are electing to award credit or only need to track attendance for the sessions. If this is the case, choose manual check in.
- IMPORTANT- In order for participants to receive a certificate for the conference, they must be checked in to the conference. Checking into each session will not generate certificates.


If you didn’t have all of your details ready or you aren’t ready for your learners to see the conference, you can choose Save Draft. Once you click Save Draft or Publish, you will be taken to the screen where you can add sessions.
- Tip- Save your conference as a draft, but go ahead and publish all of your sessions. Participants will not be able to see any sessions until you publish the conference. This will save you a lot of time when you are ready to publish!

Once you have your sessions added, you can go pack to the Edit Conference Page and publish. When you choose Publish, you will have the option to have an email about the event.
